Photo Editing

Every profession has some easy-to-go and hard techniques in their professional life to master a skill. To be able to hold up his head and say- hey, I’m the master of my field. That needs some dedication and practice to be there. You wouldn’t see a professional photographer go ‘What is focus bracketing?’ even though it is literally considered to be the hard part of photography. That is because of the practice. Not giving up on something is the key to mastering it. And for photographers, it can be ‘focus stacking’ for many.
Focus Stacking is the process of blending or stacking multiple images to create a depth of field. You might think why do we need several pictures of the same scenario? Well, it is done to create a perfect picture where everything is in focus and clear. Your several pictures will have different focal lengths. And, you will combine all the goods in one frame. That’s how you will do focus stacking. This image stacking technique has become popular in landscape photography.
If you go and click a picture of a scenario, won’t you want to capture every beauty of nature that you can see with your eye clearly? Especially with professional photographers who travel all over the world for the sack of good photos. They will want their picture to look outstanding. That is why they choose the focus stacking for their photography.
If you want your picture to be sharp and eye-catchy for the audience then you can’t avoid the focus stacking. The best thing about focus stacking for beginners is, focus stacking will make your photo look professional doesn’t matter if you are a professional or not. If you are enthusiastic and want to work well with photography then we got your back.
There are plenty of reasons that I can give you why you should do focus stacking? But the reason will always be to achieve a mind-blowing image where everything is in focus. Besides these, there are a few more reasons like…
There are many more reasons that I can add like showing off your skills, learning new things or adding new qualifications to your CV and so on. The benefits are endless.
Now you might think if this technique is so unique and effective like this then we should try this technique with every picture. Well, you can do that if you want to, but the question is do you need to? There is a high chance the answer is no. because nobody needs their every picture to have everything in focus.
Do you put sugar in your every meal, just because you like the taste of sugar? Or salt every food that you eat? No, right? Things are the same in the case of Focus Stacking. You would not need to do focus stacking in every picture that you take. So, do it when you need to do that only. Now, when exactly do you need to use focus stacking? More specifically, when is it necessary to do focus stacking?
Well, as I was saying about landscape photos previously. You will need to do focus stacking when you see a scenario that needs most of the object to be in focus then that is the time to take several pictures at once. Like real estate photos. Professional photographers mostly choose dawn or twilight time for real estate photos. The golden hour for the photoshoot. That can be a difficult time to hold focus. That will be a perfect example of when you need to do focus stacking.
Also, in jewelry photography. Jewelry images can be tough to click and keep in focus. Jewelry retouching is also a difficult task to do. If you are working with metal and stone or diamond then it’s hard to grab an image with every focal point.
To do focus stacking in any picture, you have to go through two processes. One is photography and another is photo editing. How would you know what is photo stacking, if you haven’t tried to do focus stacking by yourself at least once? Try it yourself and then say what you think about it. Let’s learn how to do the deed.
There are mainly 3 ways to take a focus stacking photo. You can totally rely on the camera, or do the photoshoot completely manually or you can go for the 50-50 option where you can take the help of your camera yet you will add your touch to the focusing. After all, you can't rely on AI 100%, you know. And yes, don’t forget to use the tripod. No matter if you are doing anything manually or automatically you need to use a tripod. Otherwise, the pictures will be hard to have any focus point at all.
Yes, you can have automatic focus stacking where you don’t have to worry about the focus stacking. The camera will focus on the points automatically and create a decent pile of pictures. There are some pretty good high-quality cameras nowadays that provide focus stacking while photo shoots. Nikon D850, Nikon Mirrorless Canon, Canon EOS R7, Canon EOS R10, Sony a7RV, and many more modern cameras offer in-built focus stacking with them.
Also, there is software that allows you to do the focus stacking easily with their free trial and free tools. To get the facility to use the automatic stacking you have to set your camera first. You need to set the camera on auto mode and set the timer on your camera and depending on the camera and camera settings you have to set it to the auto focus stacking option. Then it will automatically click pictures from different focal points.
A focus stacking is best taken in manual mode. Because it has the control of a professional photographer. You can set the exposure, aperture, shutter speed, and ISO according to your preference. And also got the freedom to change the focus points from different angles.
If you are new to this game and don’t know how to work with the manual setting in the camera, then you don’t have to worry. You would need some concentration. Set your camera on auto focus stacking mode, set the timer and do all the processes that an automatic focus stacking will need. Now sit back and take notes from the camera and see how the camera is setting its aperture, exposure, and ISO. Then experiment with them until you find your way to do it.
In the case of semi-auto focus stacking, it will be seen in editing. In semi-auto photo stacking, you need both automatic focus stacking pictures and manually clicked focus stacking pictures in one frame. You need to combine them and focus stack into one single image with the help of photo editing software like Adobe Photoshop.
Before moving straight to the photo editing part, we should talk about the photography part first. Focus stacking needs good skillful hands to be done with quality. So, let’s learn the skillful techniques to photoshoot for focus stacking.
Setting the setup is like the first stepping stone of creating a focus-stacking photo. You will need a plan to execute. What angles are you thinking of taking photos from, what lights are you thinking of using and what setting you have decided to go for? Once you are confident about the angles and the position you want to shoot then you have to set the tripod on the position from where you want to click the picture. then you need to lock down the tripod. Because you don’t want your images to be blurry or shaky. Also, even after using a tripod, there are times when the outer part needs to crop out sometimes. So, set your tripod and the position of the camera a little bit farther so that even if it needs to get cropped it won’t miss any important features.
You need to set your camera’s settings to see the exposure. Because consistency in exposure is really important in this case. Otherwise, it will be difficult for anyone to focus stack with different exposure lights on different camera settings.
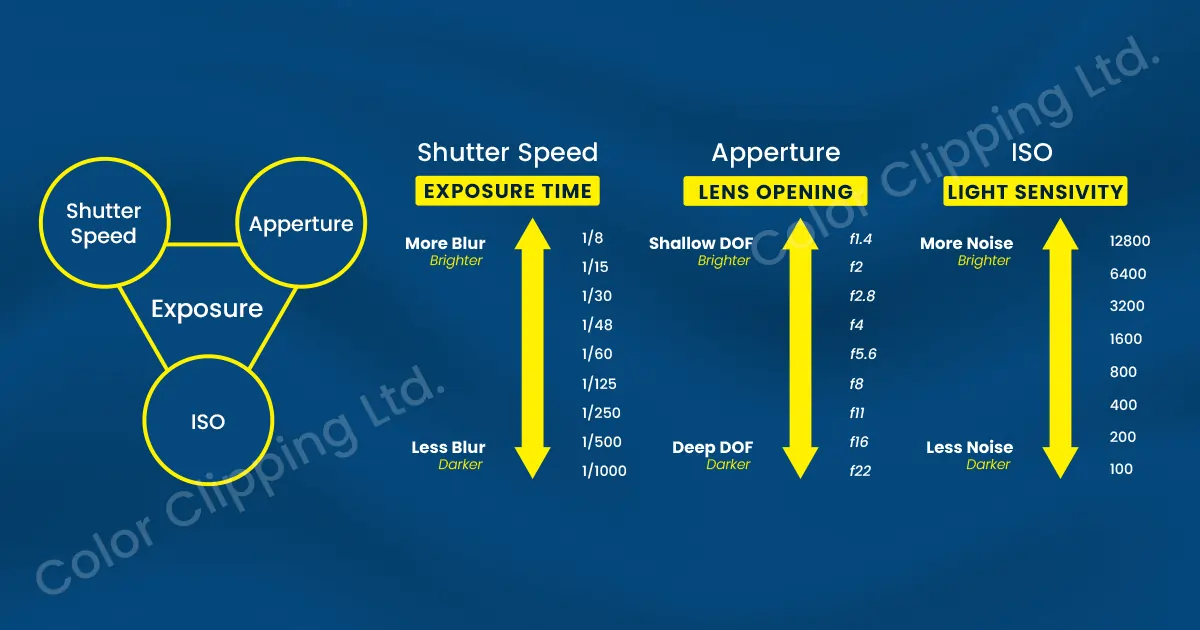
To get a crystal clear image keep ISO as low as possible. By this you will be able to avoid image noise. Keep the aperture as wide as possible. So that you can get the details in your picture. set your shutter speed as fast as possible. It will help you to keep the image sharp. So, in short, the notes are,
Now it comes to the shooting part. Now that you have out your perfect spot to shoot and set the camera settings, it's time to shoot. As I said earlier, you should set your camera a little bit further than the actual desired position. When you are fully ready for the shoot, set your camera to a single focus point, it will allow you to adjust the specific focal point in the shot. Now feel the image and click the picture. Try to keep it as clean as possible.
what to do with the focus point? Start with the nearest area of the photo to be on the focus and slowly move to the expanded area to shoot. Take pictures from several focus points and then move to the focus stacking part.
You have to take several pictures of the same area with different focus points. But in my opinion, you can also take several pictures with the same focus point. Since the pictures are taken by digital devices, they can get blurry or shaky at any part of the image. This will ensure that no area will be left out from the photoshoot for picture stacking. This was the halfway process of how to stack photos. Hopefully, you got what is stacking in photography. Now let’s know about the other better half.
To achieve that greater depth of field in your focus stack, now it has come to the part of post-processing image. What is image stacking without post-processing photos?
Now choose Adobe Photoshop or Adobe Lightroom for focus stacking your images. Focus stacking in Photoshop is easy. Let’s see the process
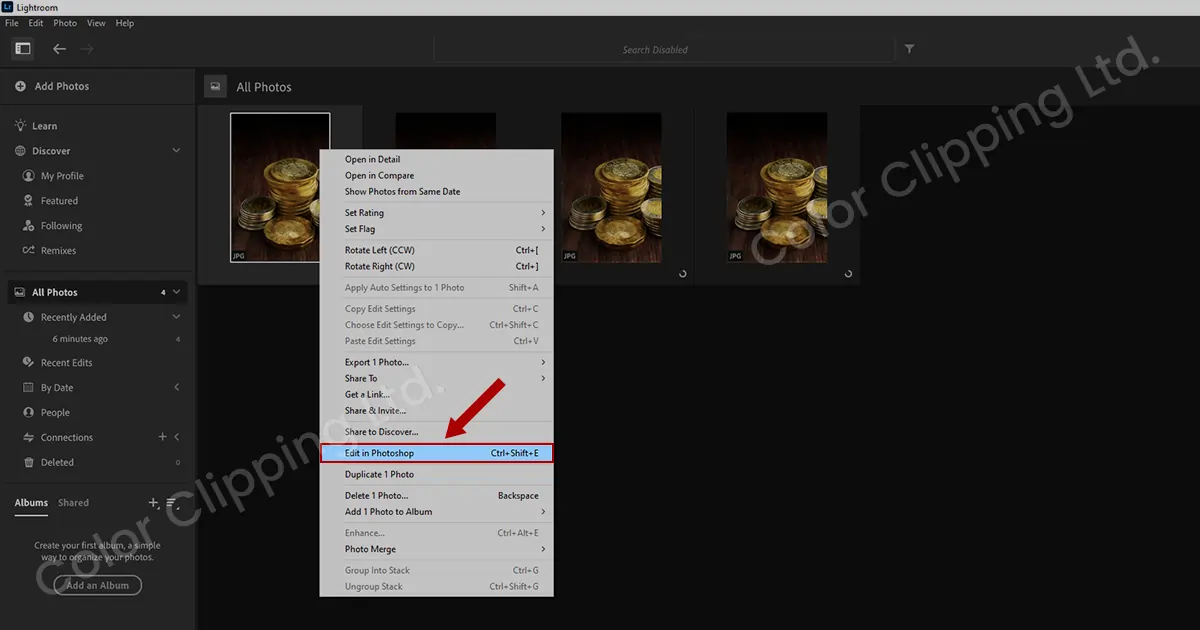
Step 1- Go to the ‘Edit’ option from the top left corner and select 'Edit in Photoshop'
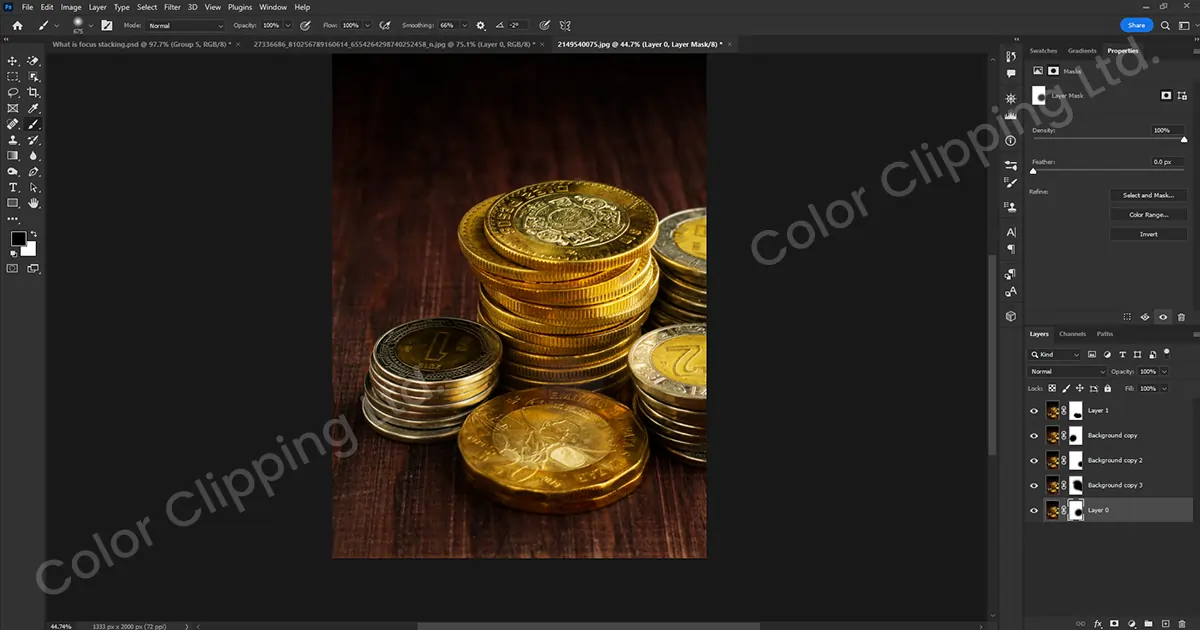
Step 2- Now that you have the photos in a stack you can select the layers from the layer panel.
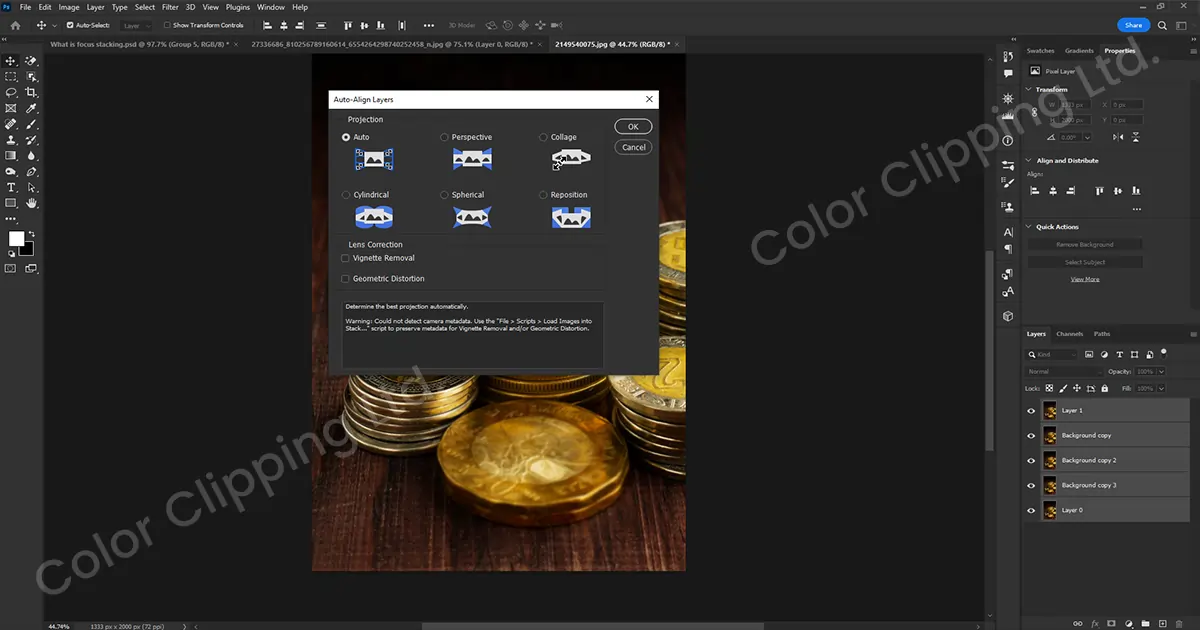
Step 3- After selecting the images in a single stack, select the layer panel and choose 'Edit'. from 'Edit' choose 'Auto-Align Layer'. From the panel select 'Auto' and click 'OK'.
Here it is suggested to group the stack images to keep them safe. But you can skip that part if you want.
These are the basic techniques for focus stacking in Adobe Photoshop.
After reading this blog, you might see this either as a very easy technique or a very hard one. But whatever you say, since you have read this far, one thing I am sure of is you have enjoyed the blog and maybe caught something new. Focus stacking is not easy, not hard either. It needs skills to be pro at. Since you have been reading this far let me give you an easter egg.
If you have a business (especially an e-commerce business) and looking for a platform that does photo post-processing at a reasonable price then you should definitely check Color Clipping Ltd. Color Clipping offers free Focus Stacking for their various photo post-processing services. Do check their website to get the best deal on your next photo editing service.

Hello, it's Anika, Content Executive from Color Clipping Ltd with a devotion to contributing my skills and knowledge more simply. Keep learning and growing with us.
Deowan Shimul
Since 2010, Deowan Shimul has been refining the art of jewelry retouching, combining precision with advanced technology. In 2017, he expanded his expertise into commercial product photography and now leads a team of 120 professionals. Together, they produce high-quality visual solutions that help brands grow, streamline workflows, and achieve real results for clients worldwide.

Chief Production Officer